前言
在 Github Actions功能還沒推出之前,佈署Hexo網站總是有點麻煩,之前的佈署方式可以參考title-這篇文章,麻煩的地方在於文章寫好要上傳後,以我為例,要做兩件事情
- 版本控管
- 下
Hexo Deploy指令
自從知道Github Actions功能推出後。我就聯想到持續整合、持續發布(CI/CD)派上用場了,於是開始研究要怎麼使用Github Actions來達成CI/CD。
以下是我的操作步驟
操作步驟
將Hexo專案上傳至Github的Repository
先把你的專案上傳到Github的Repository,建議是用Private的,除非你願意分享你的專案原始碼給大家參觀。
產生一組佈署需用到的私鑰及公鑰
利用ssh-keygen產生一組私鑰及公鑰
關於ssh-keygen介紹可參考title-ssh-keygen簡介
ssh-kegen -f github_deploy_key以上面指令為例,將會產生一個github_deploy_key及github_deploy_key.pub
預設會放在使用者目錄底下的.ssh目錄中
如果找不到檔案在哪裡,可以在隨便一個資料夾的網址列輸入%USERPROFILE%/.ssh/找找看。
如果想在指定目錄產生密鑰檔的話,可以先到目的資料夾的網址列,輸入cmd後,再輸入產生密鑰的指令,就會在該目錄底下產生密鑰檔。
接下來要做的事情是將私鑰及公鑰分別設定到私有的Repository及個人網站的Repository
於Hexo專案的Repository設定私鑰
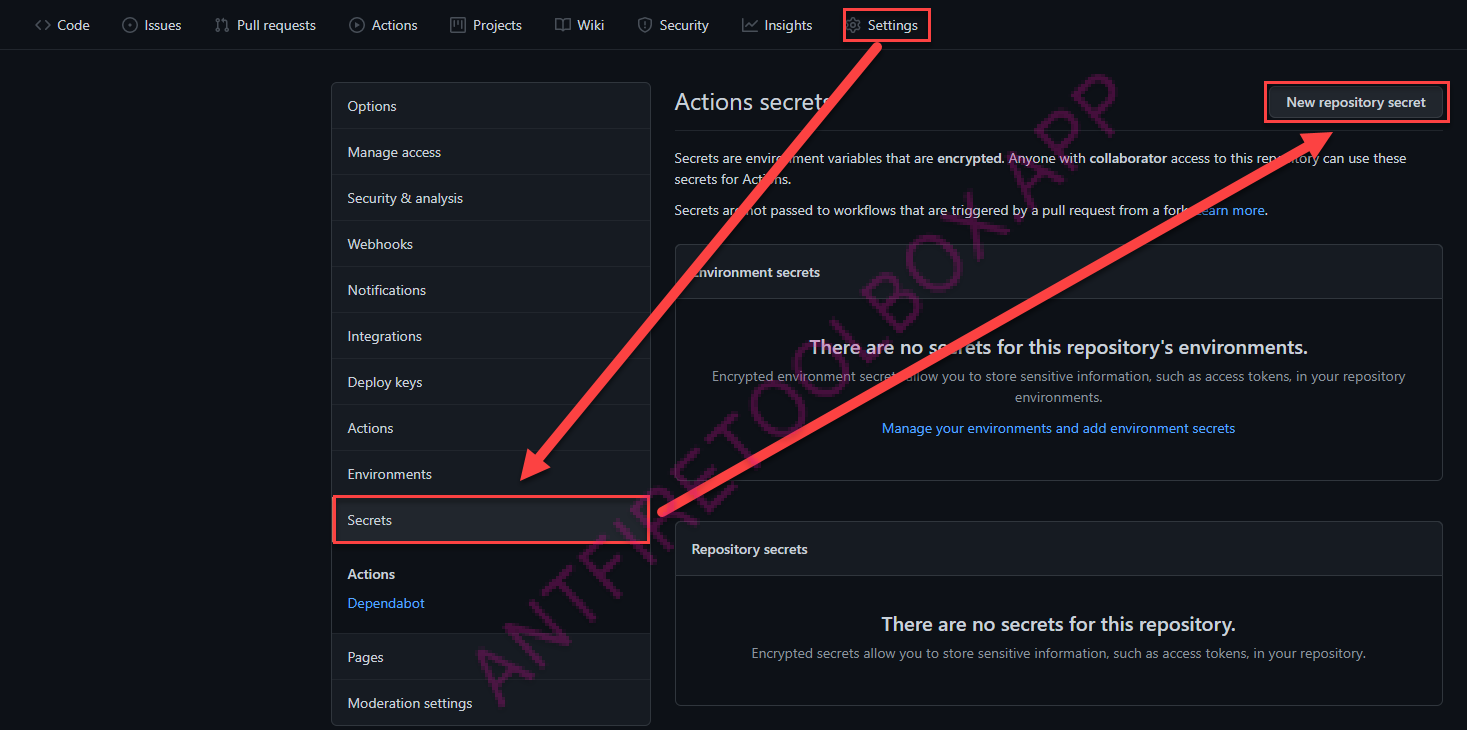
先開啟Hexo 專案的Respository,然後點選Settings > Secrets tets
然後點右上角的New repository secret按鈕,如下圖。

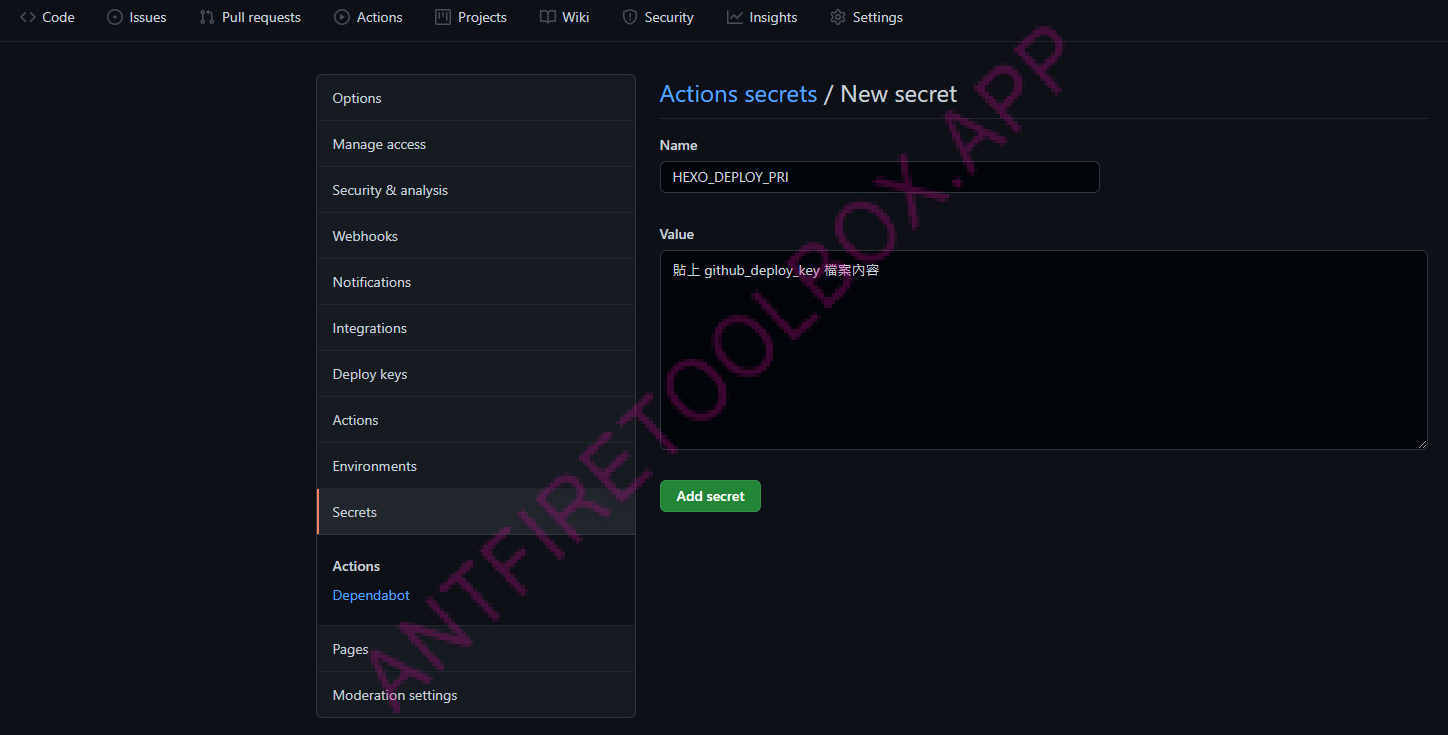
接著會進入 Actions secret設定畫面,如下圖

Name 填入 HEXO_DEPLOY_PRI
Value 填入私鑰檔案(github_deploy_key)內容
接著點 Add secret按鈕
於Github個人網站的Repository設定公鑰
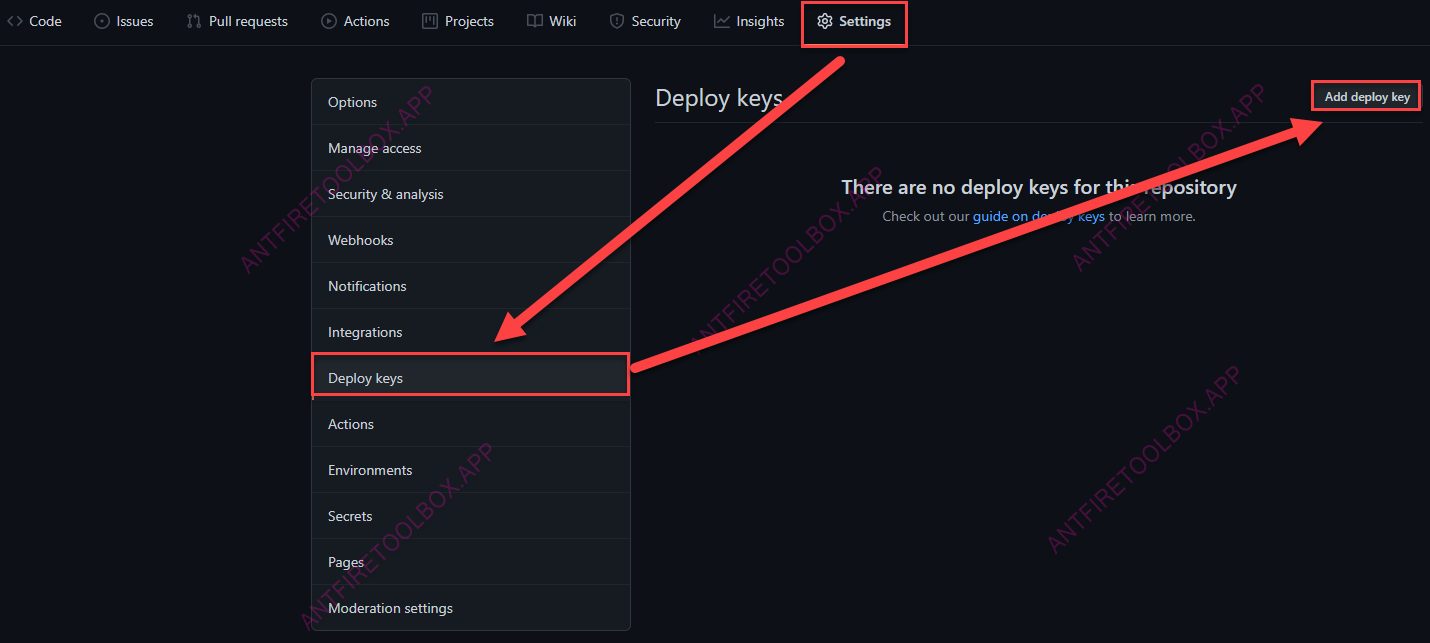
開啟 Github個人網站Repository後,點選Settings > Deploy keys
然後點右上角的Add deploy key按鈕,如下圖。

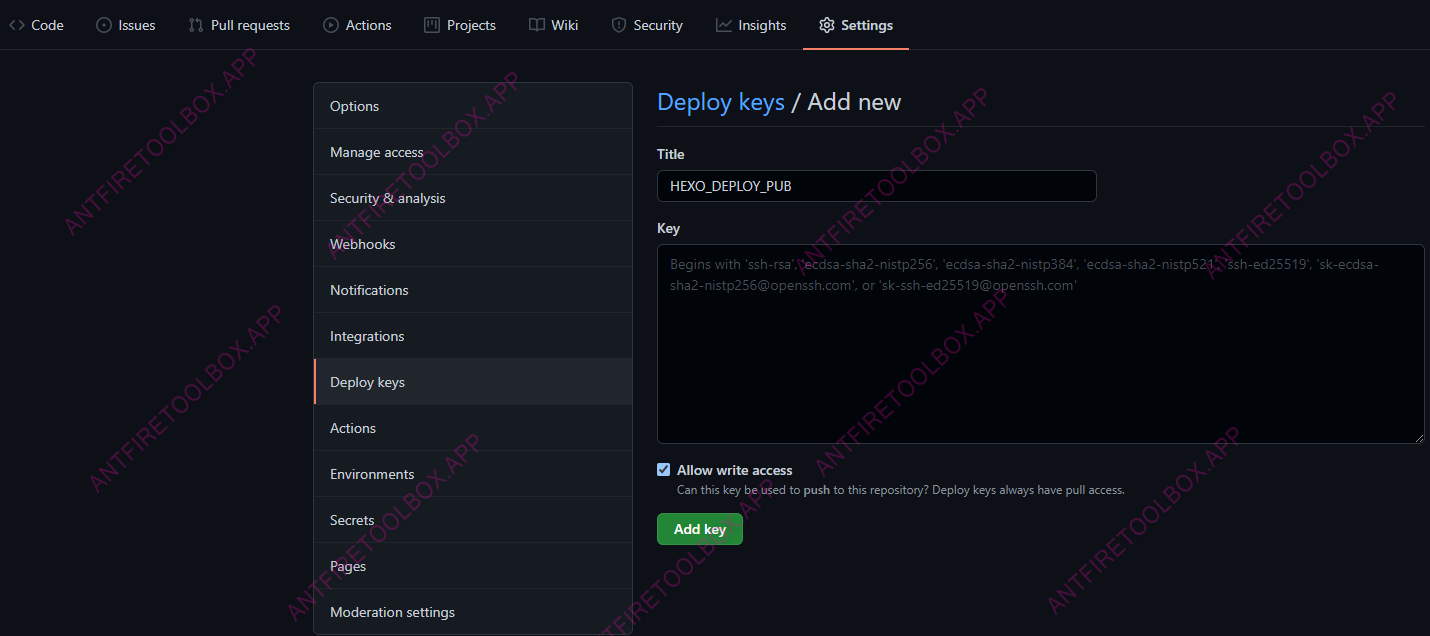
Title 填入 HEXO_DEPLOY_PUB
Key 填入公鑰檔案(github_deploy_key.pub)內容
記得勾選 Allow write access
否則佈署的檔案無法寫入
大致如下圖

接著點 Add key按鈕
於Hexo專案 Repository設定 Actions 腳本
接著到放Hexo 專案的Repository設定Actions腳本,讓每次版本Push上去的時候,執行Actions的腳本內容
以下是參考網路教學並略做修改,以順利執行
name: HEXO CI

on:
  push:
    branches:
    - master

jobs:
  build:
    runs-on: ubuntu-latest
    strategy:
      matrix:
        node-version: [12.x]

    steps:
      - uses: actions/checkout@v1

      - name: Use Node.js ${{ matrix.node-version }}
        uses: actions/setup-node@v1
        with:
          node-version: ${{ matrix.node-version }}

      - name: Configuration environment
        env:
          HEXO_DEPLOY_PRI: ${{secrets.HEXO_DEPLOY_PRI}}
        run: |
          mkdir -p ~/.ssh/
          echo "$HEXO_DEPLOY_PRI" | tr -d '\r' > ~/.ssh/id_rsa
          chmod 600 ~/.ssh/id_rsa
          ssh-keyscan github.com >> ~/.ssh/known_hosts
          git config --global user.name "填寫你的Github 帳號"
          git config --global user.email "填寫你的Github email"
      - name: Install dependencies
        run: |
          npm i -g hexo-cli
          npm i
      - name: Deploy hexo
        run: |
hexo clean && hexo generate && hexo deploy貼上腳本後,記得點選右上角的Start commit
確認已安裝 Hexo Deployer Git
npm install hexo-deployer-git --save修改 _config.yml
到 _config.yml 的 deploy區塊
修改成如下
ss
deploy:
  type: git
  repo: git@github.com:[你的github帳號]/[你的github帳號].github.io.git
  branch: master
將 [你的github帳號] 改成 自己的github帳號
存檔之後,就可以嘗試將Hexo 專案 Git Push上去了。
Update 2023/02/07
Github公告 Node.js 12版的Action即將淘汰,建議使用 Node.js 16
因此,我把Action改成 node.js 16
name: HEXO CI
on:
  push:
    branches:
    - master
jobs:
  build:
    runs-on: ubuntu-latest
    strategy:
      matrix:
        node-version: [16.x]
    steps:
      - uses: actions/checkout@v3
      - name: Use Node.js ${{ matrix.node-version }}
        uses: actions/setup-node@v3
        with:
          node-version: ${{ matrix.node-version }}
      - name: Cache node modules
        uses: actions/cache@v3
        with:
          path: ~/.npm
          key: ${{ runner.os }}-node-${{ hashFiles('**/package-lock.json') }}
      - name: Configuration environment
        env:
          HEXO_DEPLOY_PRI: ${{secrets.HEXO_DEPLOY_PRI}}
        run: |
          mkdir -p ~/.ssh/
          echo "$HEXO_DEPLOY_PRI" | tr -d '\r' > ~/.ssh/id_rsa
          chmod 600 ~/.ssh/id_rsa
          ssh-keyscan github.com >> ~/.ssh/known_hosts
          git config --global user.name "填寫你的Github 帳號"
          git config --global user.email "填寫你的Github email"
      - name: Install dependencies
        run: |
          npm i -g hexo-cli
          npm i
      - name: Deploy hexo
        run: |
          hexo clean && hexo generate && hexo deploy


